Posts
By default WordPress has two type of content – ‘pages’ and ‘posts’. Posts and pages work in a very similar way despite being different types of content. This tutorial goes through posts first. Read about adding pages here.
Pages
- Pages are used to build static site content and website functionality. Often accessible from the website front page.
- Examples – Typically would be used to build the ‘About Us’, ‘Contact Us’, ‘Terms and Conditions’, ‘Search” pages.
- Pages can be built from a variety of templates which change the layout of the page and can add functionality. The number of templates available depend on the complexity of the site theme.
Posts
- Time dependant site content. They are listed in reverse chronological order.
- Examples – Typically would be used to add news, blog posts etc.
- On most sites posts are based on a single template.
- Posts are organised by categories and to a lesser extent tags.
Create New Post
To create a new post:
- Hover over ‘Posts‘ on the navigation menu. When the post sub-menu appears click on ‘Add New’.
- You will be taken to the post editing screen shown below.
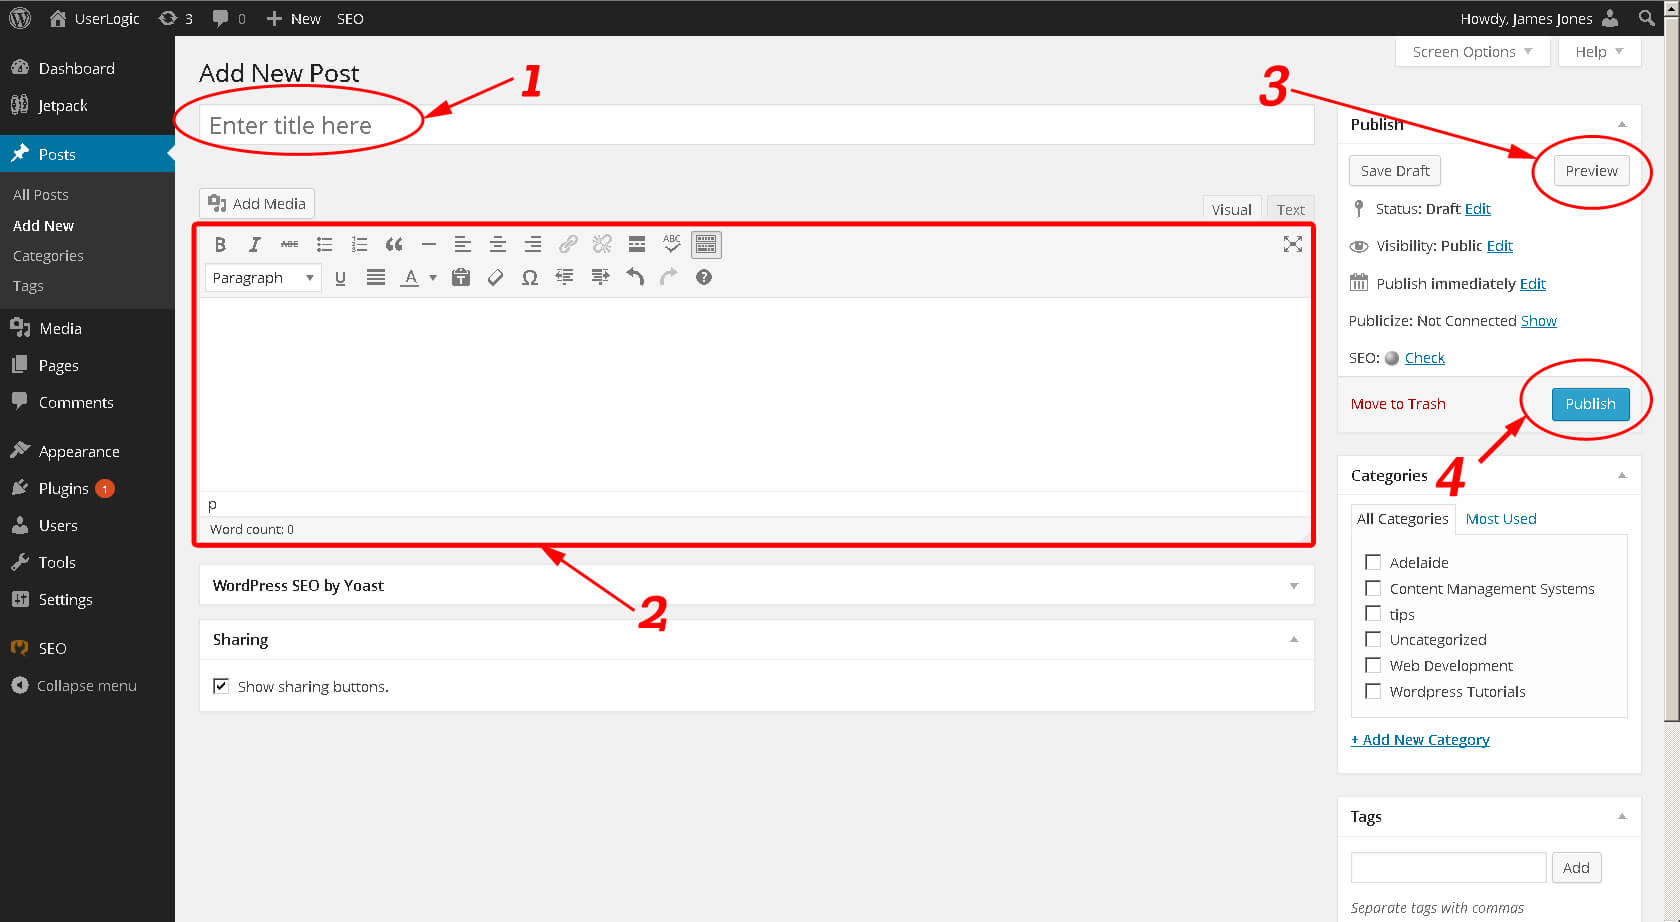
The post editing screen - Write a title of the post in the title field.
- Write some content in the post editing area. There are formatting buttons available which are similar to Microsoft Word. These buttons are described in more detail at the WordPress Visual Editor page.
- Click Preview. This step is optional but allows you see how your post will look like on the front end without publishing it.
- Click ‘Publish’.
- ‘Post published’ will appear at the top of the screen and look like the image below. Click on ‘View post’ to see your published post on the website.

This notification will appear at the top of the screen.
This is the absolute minimum action required to publish a post. There is a lot more that you can do with content which is described further on. If you go back to edit this post you can save your changes by clicking ‘Update’ which replaces the ‘Publish’ button.
Images
Adding Images
Adding images is a great way to spice up a post – a picture is worth a thousand words after all. To add an image:
- Navigate to the post or page editing screen.
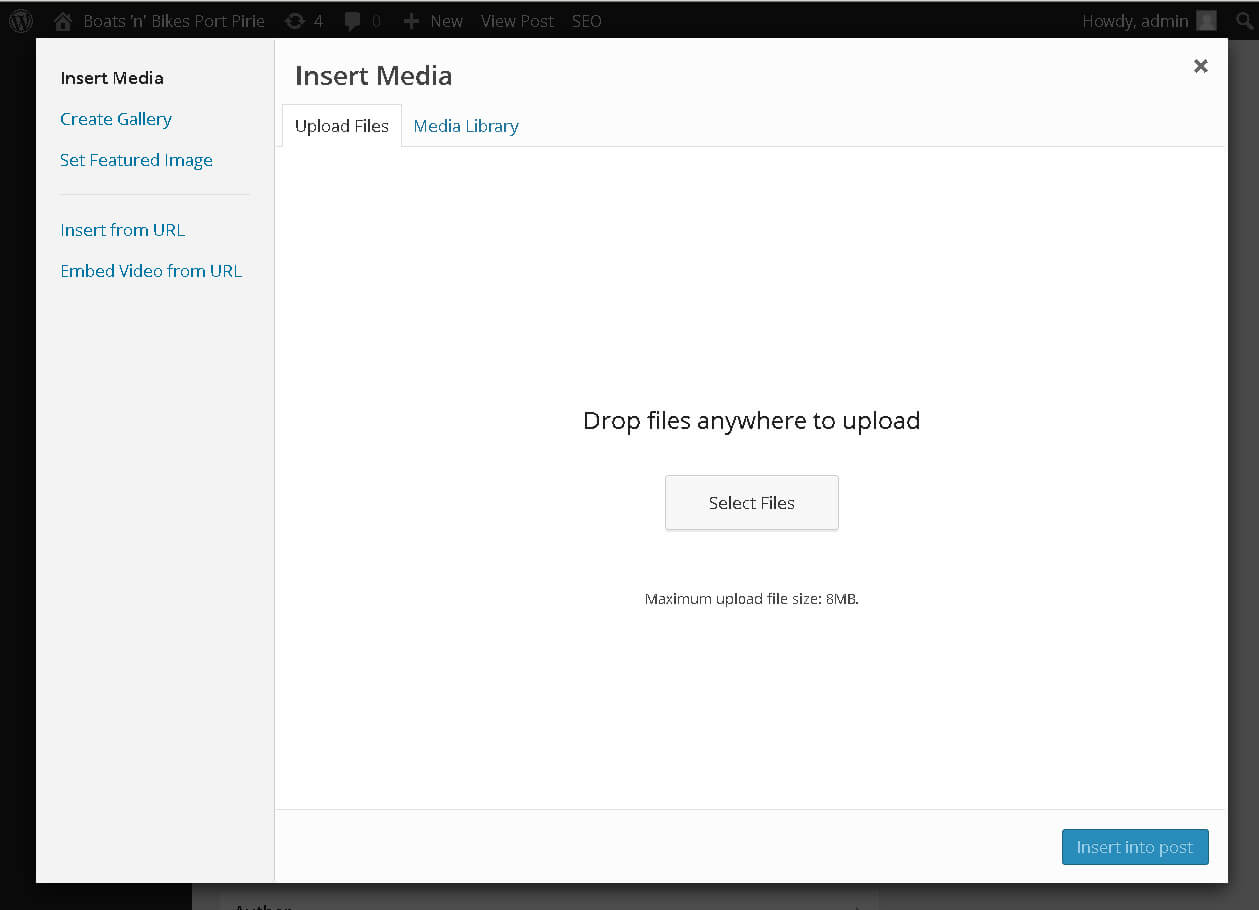
- Click ‘Add Media’ as shown in the image below.

- You can select a picture from the media library or upload a file. When you upload a file it is added to the media library for future usage. To upload a file select the ‘Upload Files’ tab. You’ll see a screen like the image below. Drag and drop the image you want onto the window or search your hard drive for the image by clicking ‘Select Files’.
-
When the file is selected it will be added to the media library. In this case I’m using a picture of myself.

- Fill in the ‘Attachment Details’ form with any information about the image that you want. A typical example is shown below. To optimise your site for search engines you should fill in as much details as possible. Some typical attachment details when inserting an image:
- Title – The title of the image
- Caption – The caption text for the image. This text will appear under the image.
- Alternative Text – A description of the image. This text appears if your image fails to load for some reason. It is also the text that a screen reader will play to a blind person so fill it in if you want your site to be accessible.
- Description – Also a description but oddly enough, not as important to search engine optimisation as alternative text. Just copy and paste the text from alternative text into this field.
- Alignment – Set the image to sit left right or centred on the page. We usually use centred.
- Link To – This changes what happens when someone clicks the image. The options are:
- Media File – Links to the full-sized image. It look like this. If in doubt choose this option.
- Attachment Page – Links to the full size image and shows details about the image. Will look like this.
- Custom URL – Links to an address that you type in yourself.
- None – Clicking on the image does nothing.
- Size – Choose size of the image. For small images using Full Size is fine.
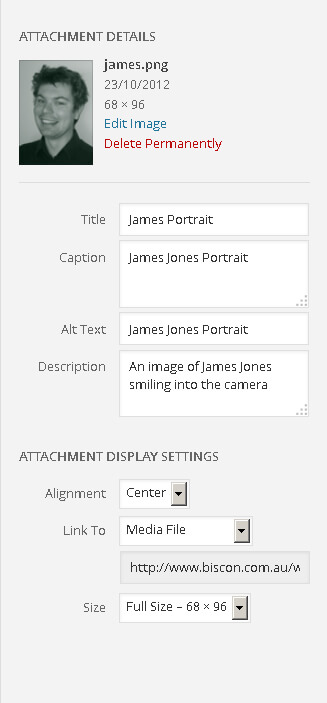
- Click ‘Insert into post’.
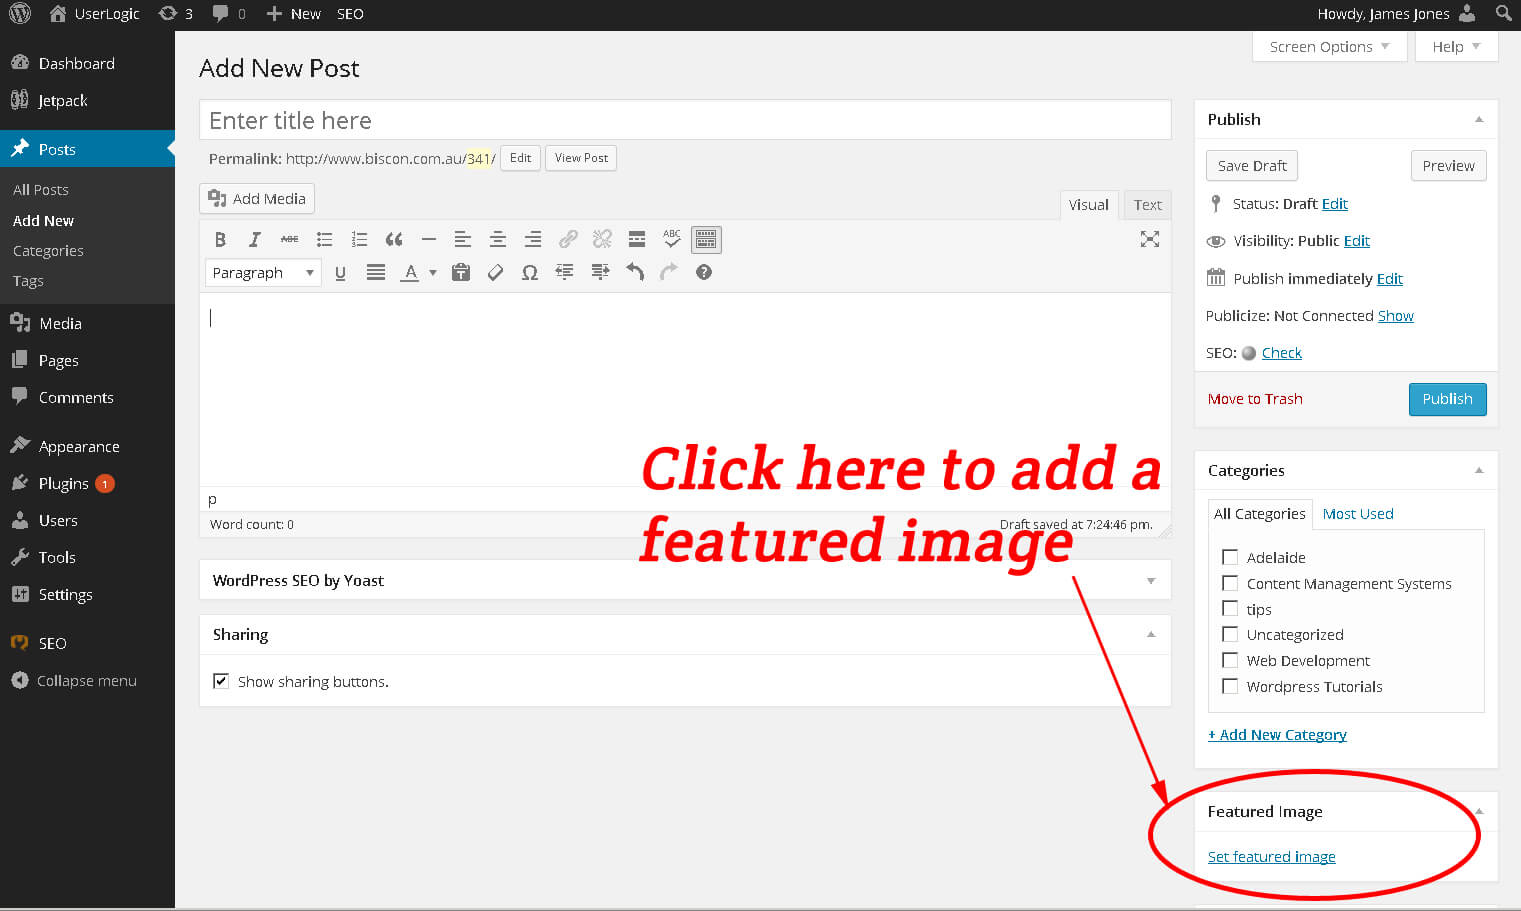
Featured Images
When you create a post you will most likely want to add a ‘Featured Image‘. The reason for this is to make your post more interesting out on the front end. You can see the difference a featured image makes by looking at the screen shot of Boats ‘N’ Bikes Port Pirie below.

To add a featured image:
- Navigate to the post or page editing screen.
- Click ‘Set Featured Image’ as shown in the image below.
- Select an image from the media library or upload an image just like before. Fill in the details necessary.
- Click ‘Set Featured Image’ on the bottom right of the screen.
- Click ‘Publish’ or ‘Update’ in the post editing screen to save your choice to the database.
Most images will work fine as featured images, but be careful as they will be cropped to suit the shape in the theme.
Videos
Videos can be added to the site in two different ways. You can embed videos from a video hosting website like YouTube or Vimeo. Or you can upload them into your website media library. Embedding from a video site is the recommended option and you can read why you should never upload a video to WordPress in this article.
Embedding a video
To embed a video from YouTube into your content:
- Upload the video to YouTube if it isn’t uploaded already. There are heaps of guides on how to do upload videos to YouTube so I won’t rewrite them here. Two handy guides for uploading videos are Upload a video to YouTube and this video.
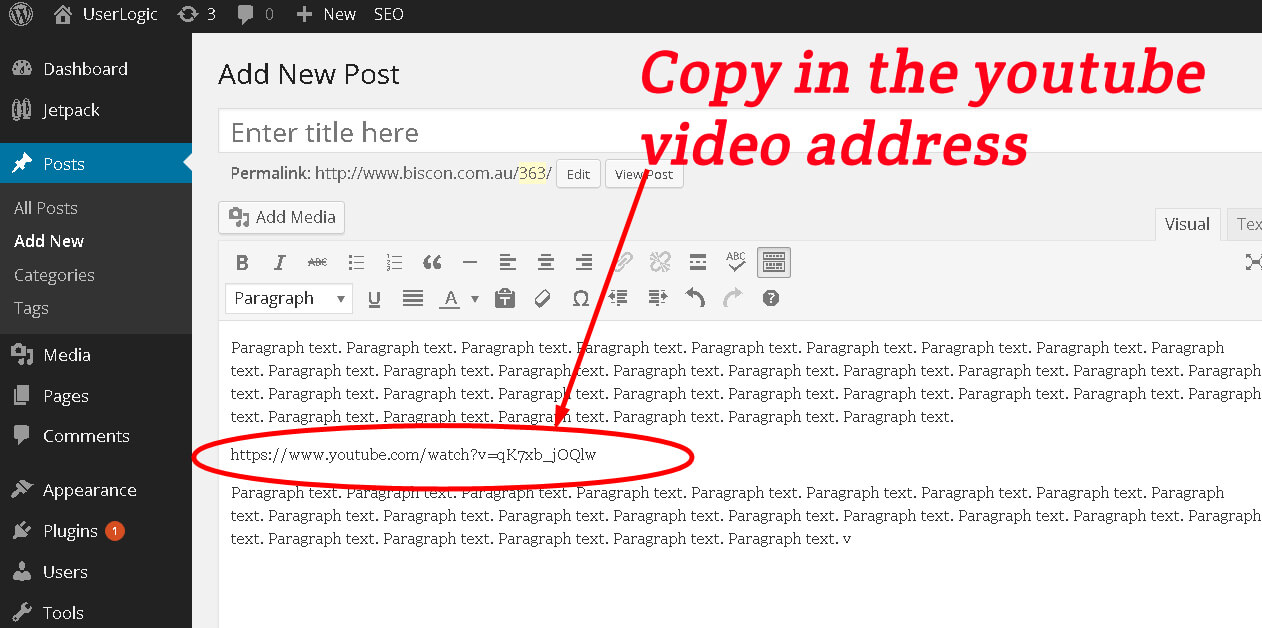
- Navigate to the YouTube video and copy its address. For example the address of one of our PremiumBreed tutorials is https://www.youtube.com/watch?v=qK7xb_jOQlw
- Navigate to the post or page editing screen.
- In the editing window paste the address into your post or page as shown in the image below. Keep the text of the link separate from your other text.
- Click ‘Publish’ or ‘Update’ in the post editing screen to save your choice to the database. Your video should appear in the post similar to the example below.

Troubleshooting embedded videos.
Sometimes the embed doesn’t work and when you view your post you will just see the text you copied. If this happens do the following:
- Navigate to the post editing screen.
- Switch from the visual editor to the text editor as shown below.
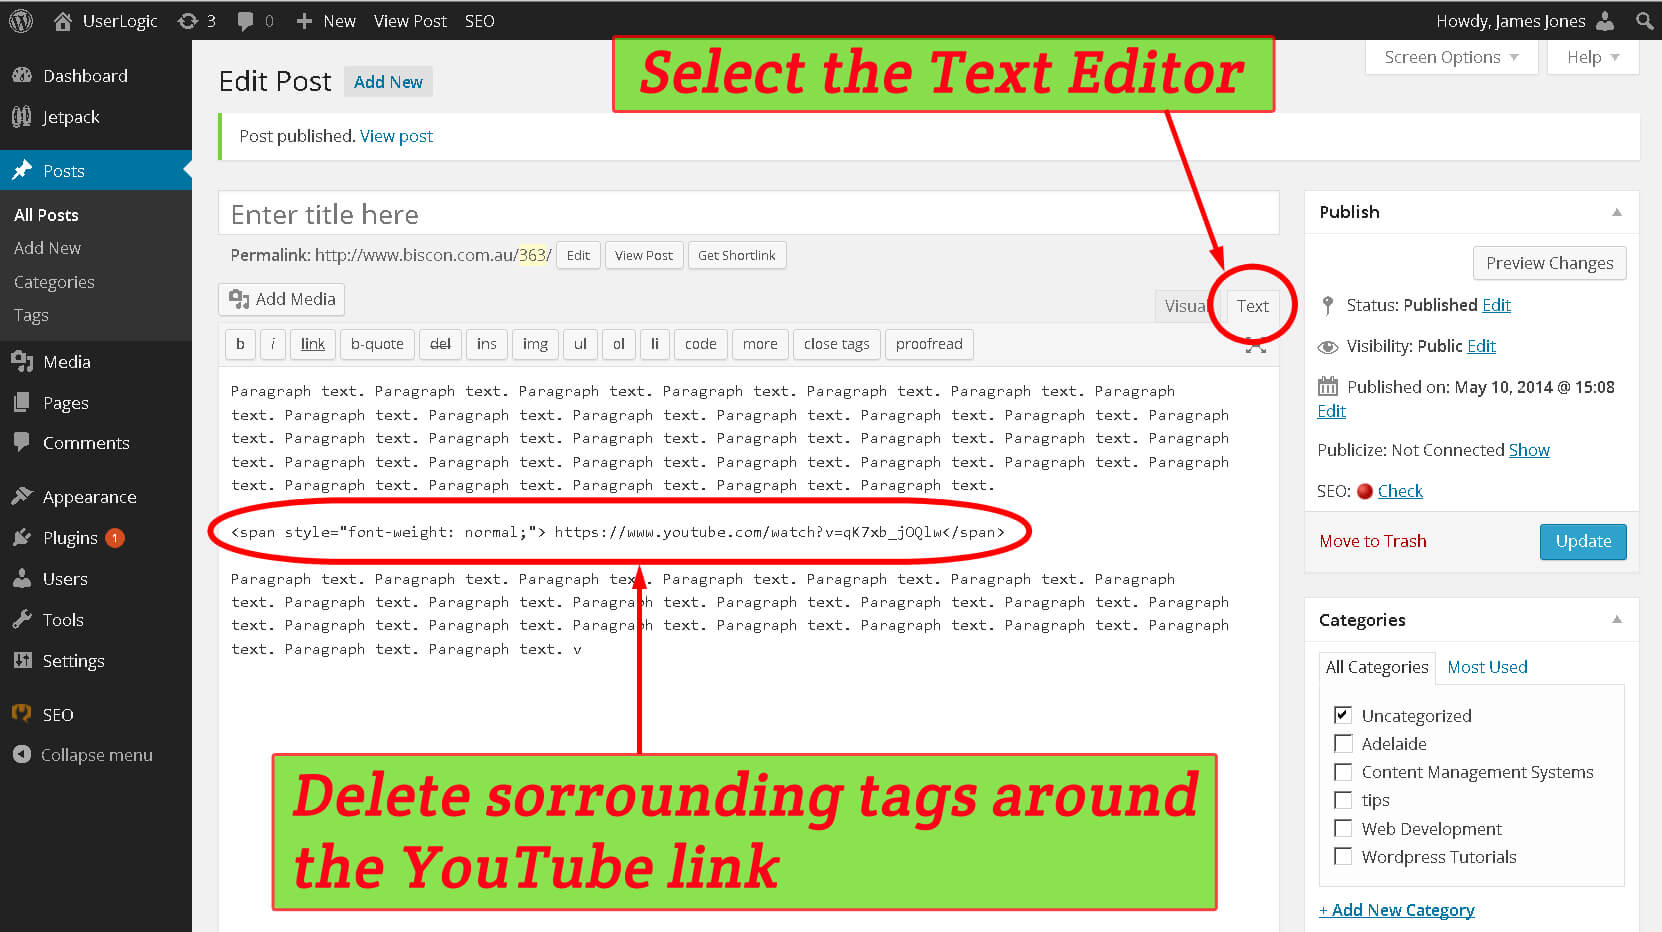
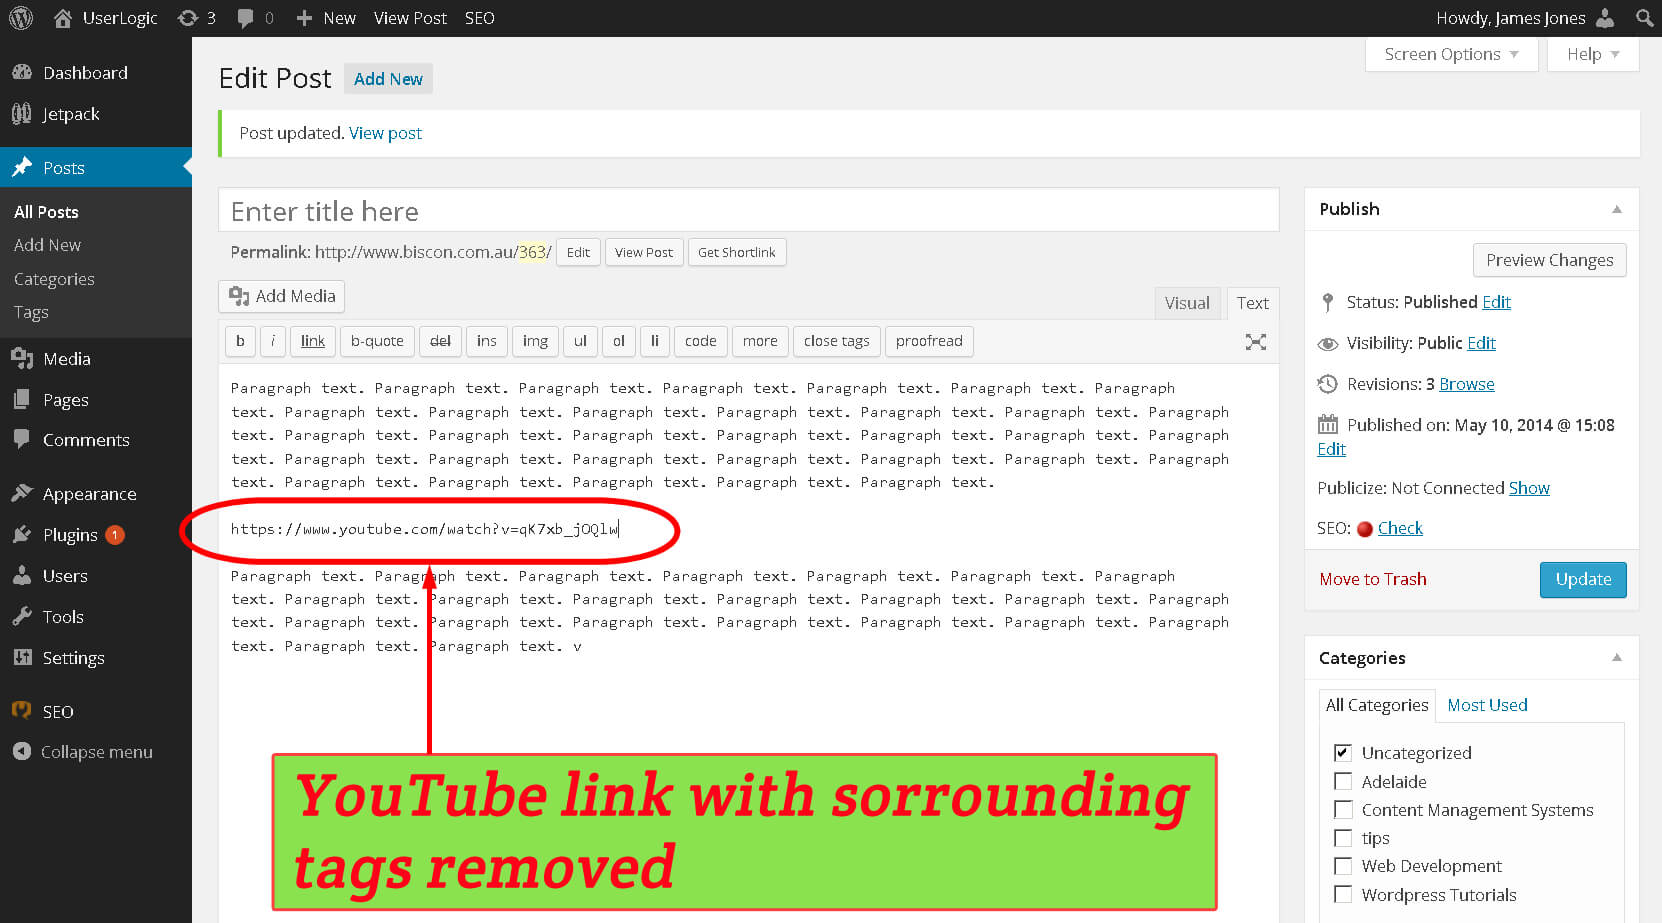
- Remove the html tags that surround the link. In our case the offending tag is a <span> tag. Sometimes the link can be surrounded by an <a> tag too. Your link should sit on its own as per the image below.
Uploading a video
To upload a video and place it in your content:
- Navigate to the post or page editing screen.
- Click ‘Add Media’ and upload the video or select it from the media library like you would for an image.
- Fill in the details of the video similarly to the image below. In most cases for ‘Attachment Display Settings’ you will want to choose ‘Embed Media Player’
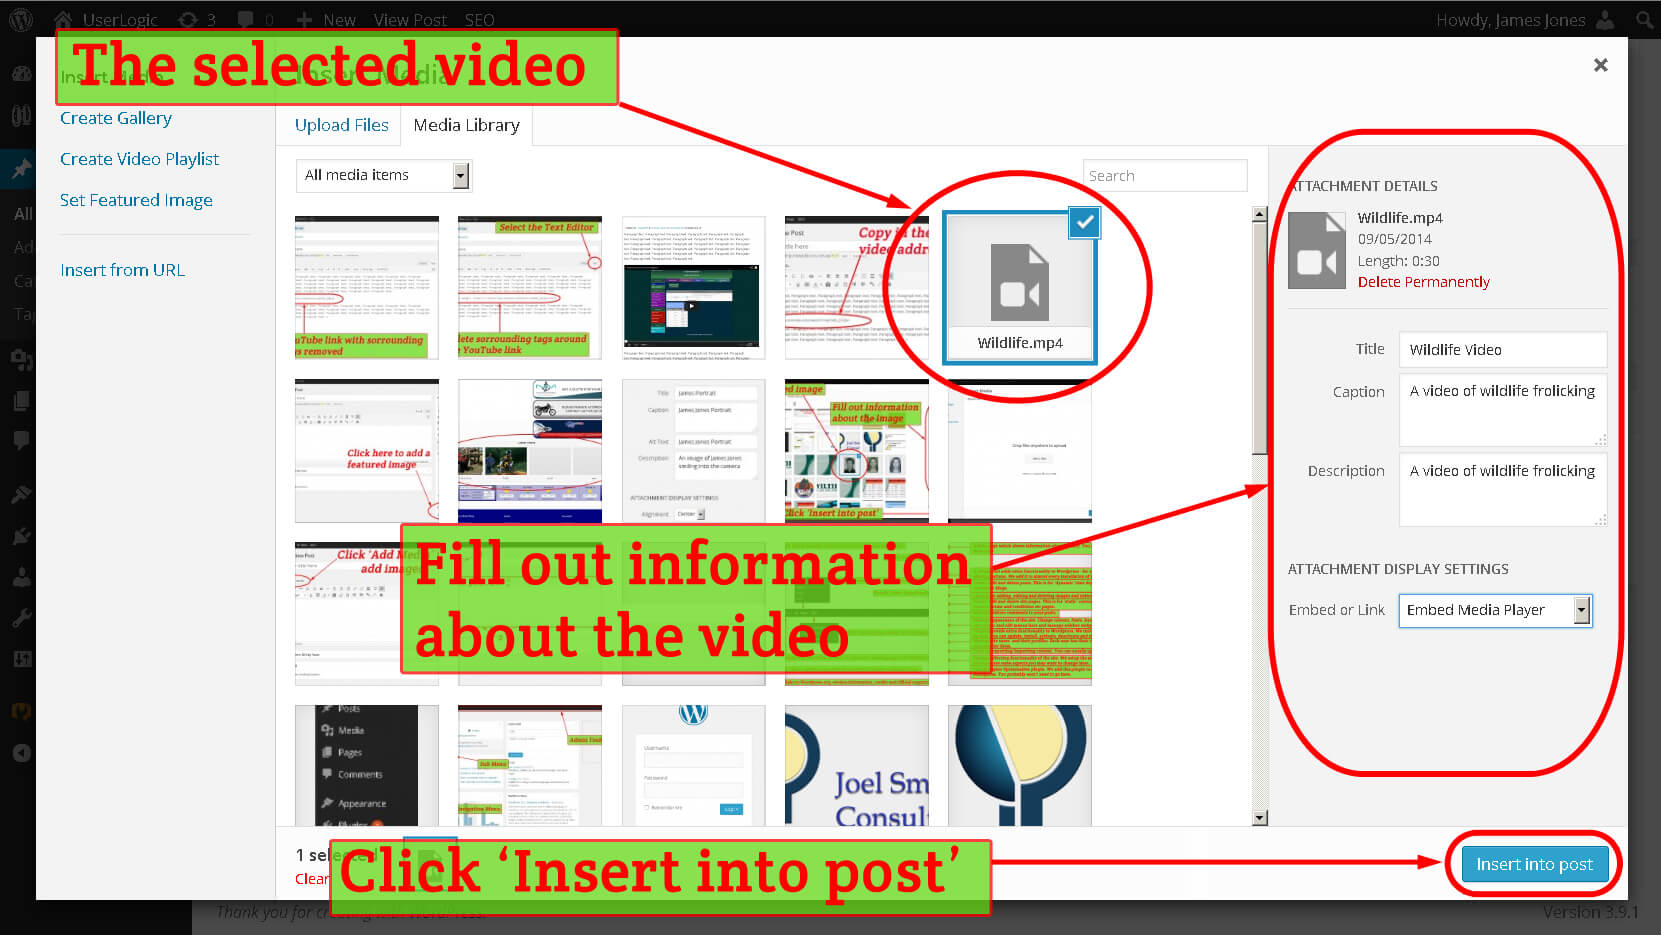
- Click ‘Insert into post’ on the bottom right of the screen.
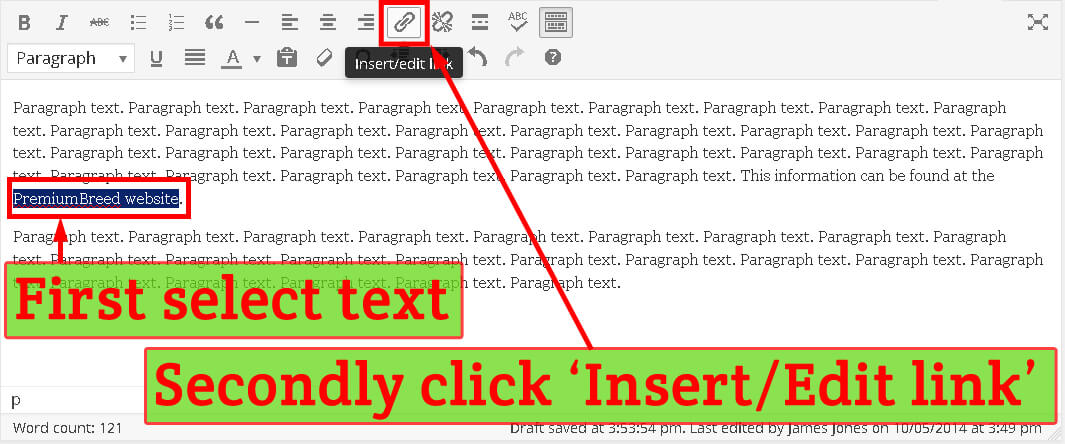
Adding Links
Links will give your site more life and are great for Search Engine Optimisation. To add a link:
- In the post editing window write out the text you want to link and then highlight it by clicking and dragging.
- After highlighting click the ‘Insert/Edit link’ button. A pop up dialog will appear.
- Do one of the following –
- External Links – Paste or write out the address you want to link to in the ‘URL’ field. Give the link a relevant title in the ‘Title’ field.
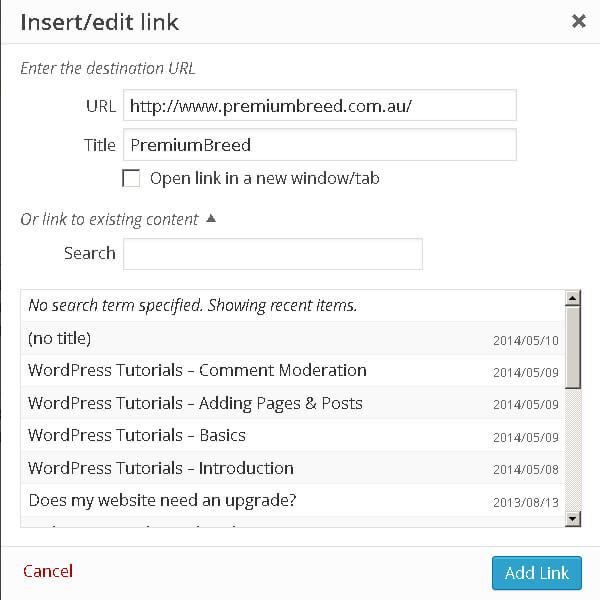
The Insert/Edit link pop up with details filled in for an external web address - Internal Links – Select ‘link to existing content’ if you want to link to a page within your site. Then type in the search bar for the content you want to link to.
- External Links – Paste or write out the address you want to link to in the ‘URL’ field. Give the link a relevant title in the ‘Title’ field.
- Click ‘Add Link’.
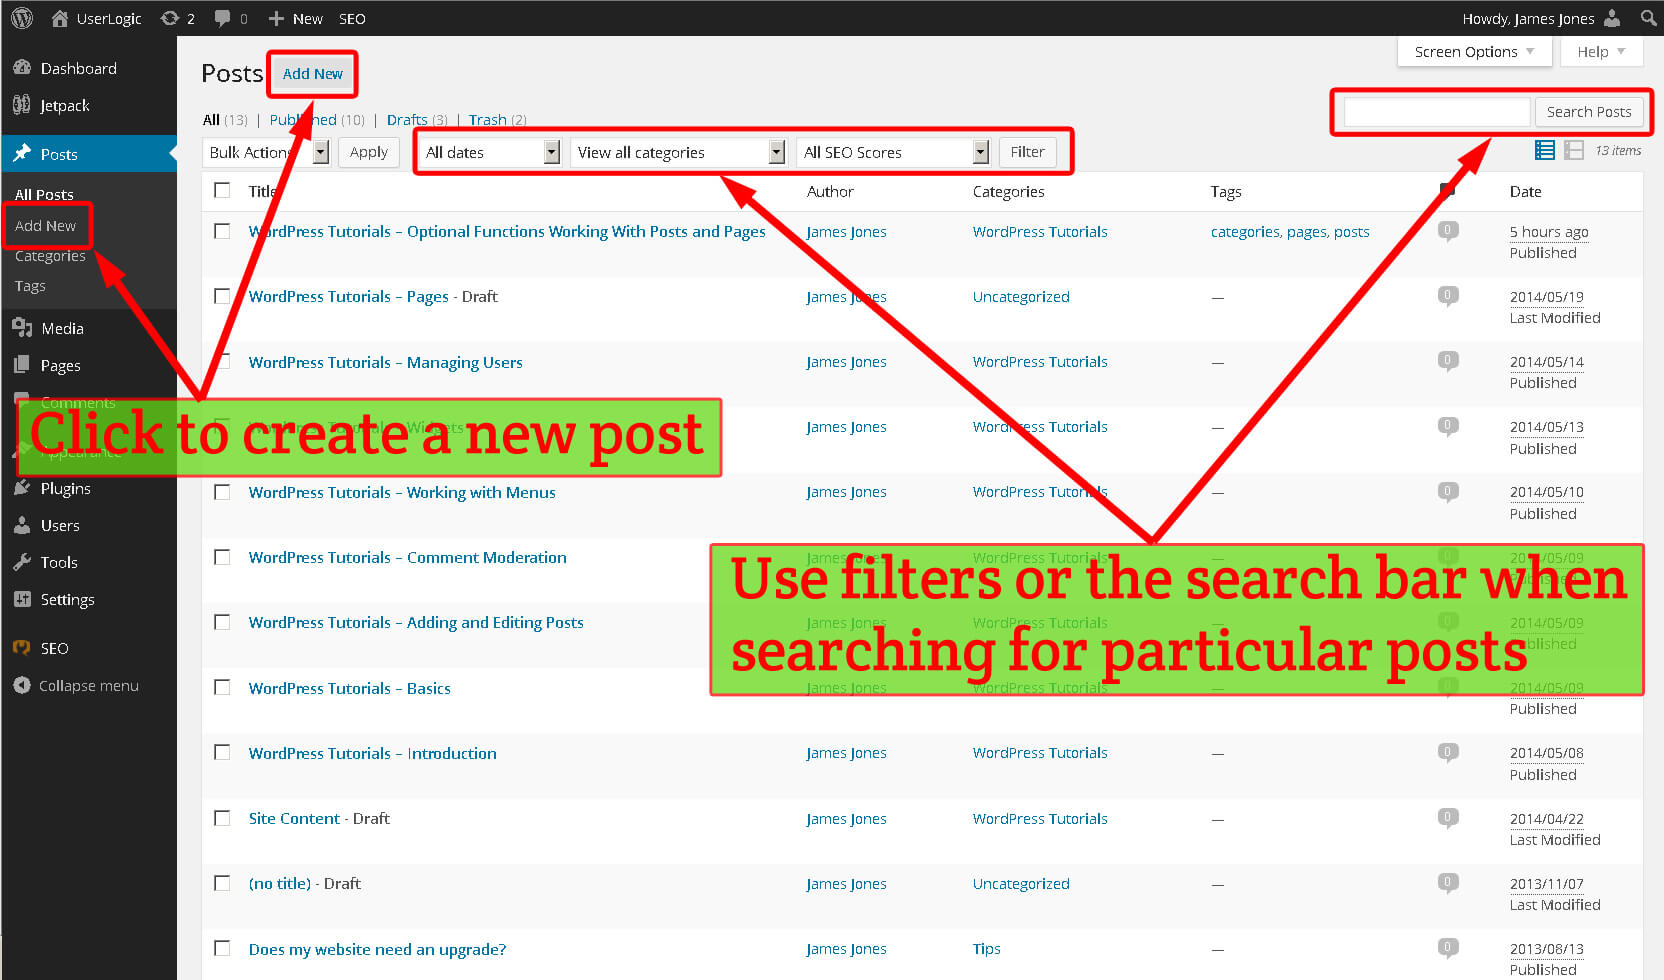
Managing Posts
To get to the posts management screen use the navigation menu to go to Posts → All Posts. Your screen will look like the image below. From here you can edit, delete and create posts.
Editing Posts
To edit a post:
- Use the navigation menu to go to Posts → All Posts
- Hover over the post you want to edit.
- Click ‘Edit’ which will appear when you hover over the post.
- You will be taken to the post editing screen.

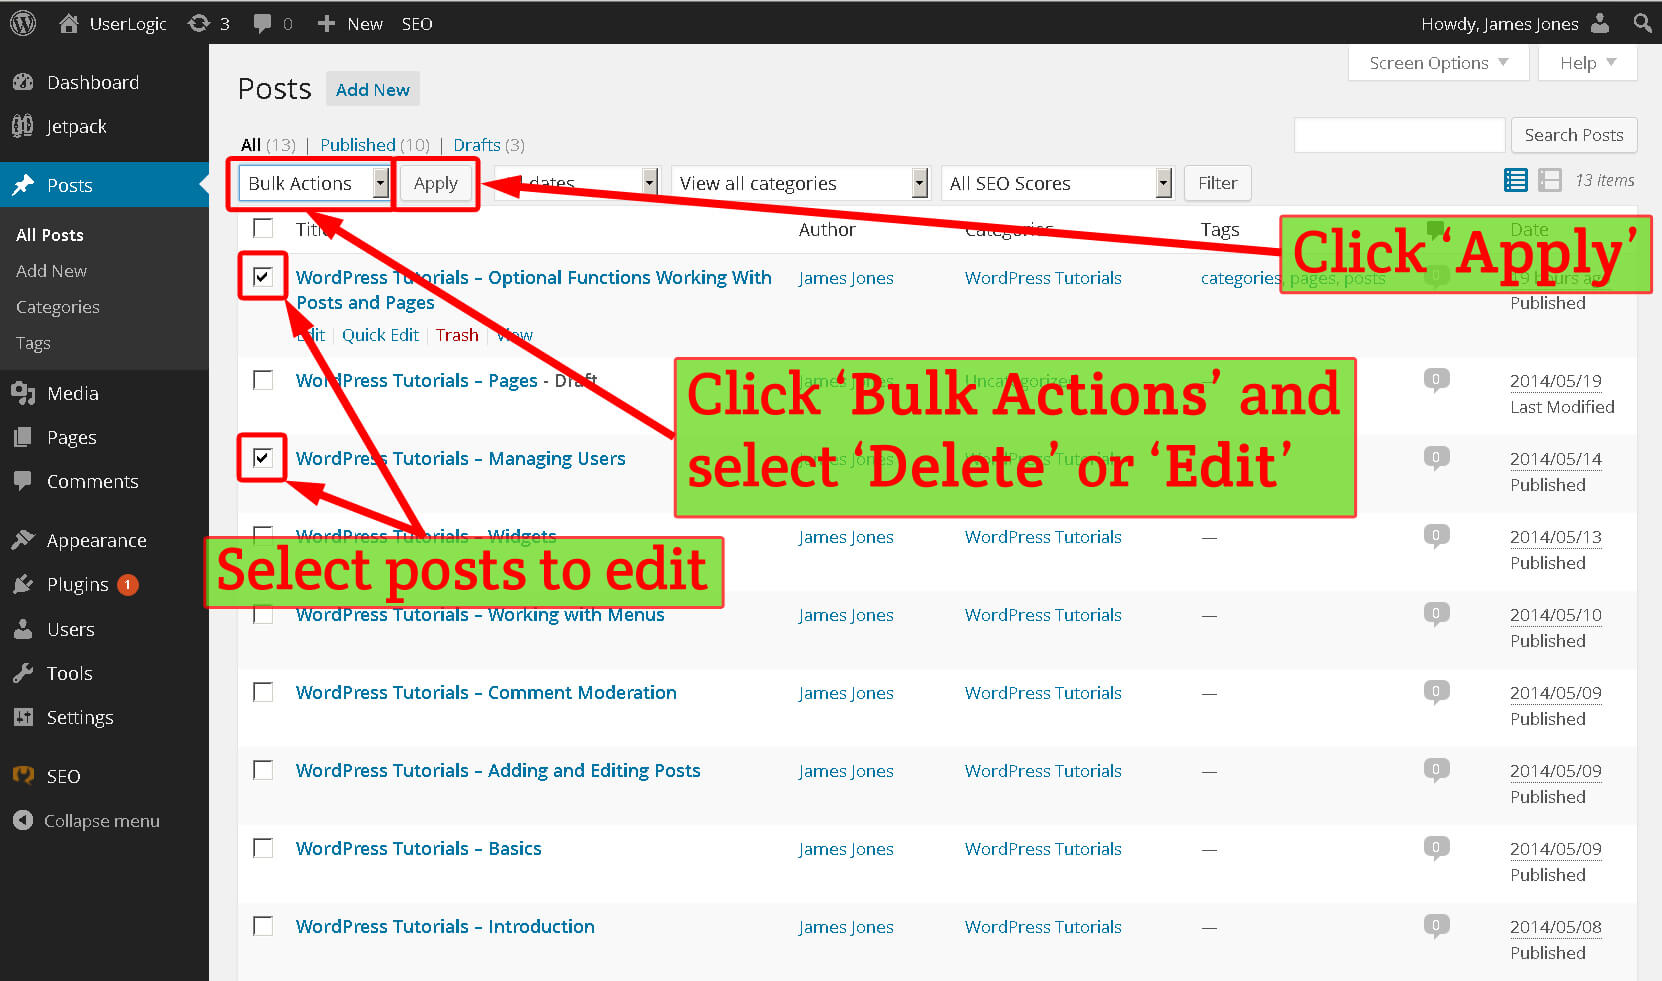
Edit Multiple Posts
To edit multiple posts at once:
- Use the navigation menu to go to Posts → All Posts
- Tick the posts you want to edit. In the example below I’ve selected two posts
- From the ‘Bulk Actions’ drop down menu select ‘Edit’.
- Click ‘Apply’.
- An editing options box will appear looking like the image below.
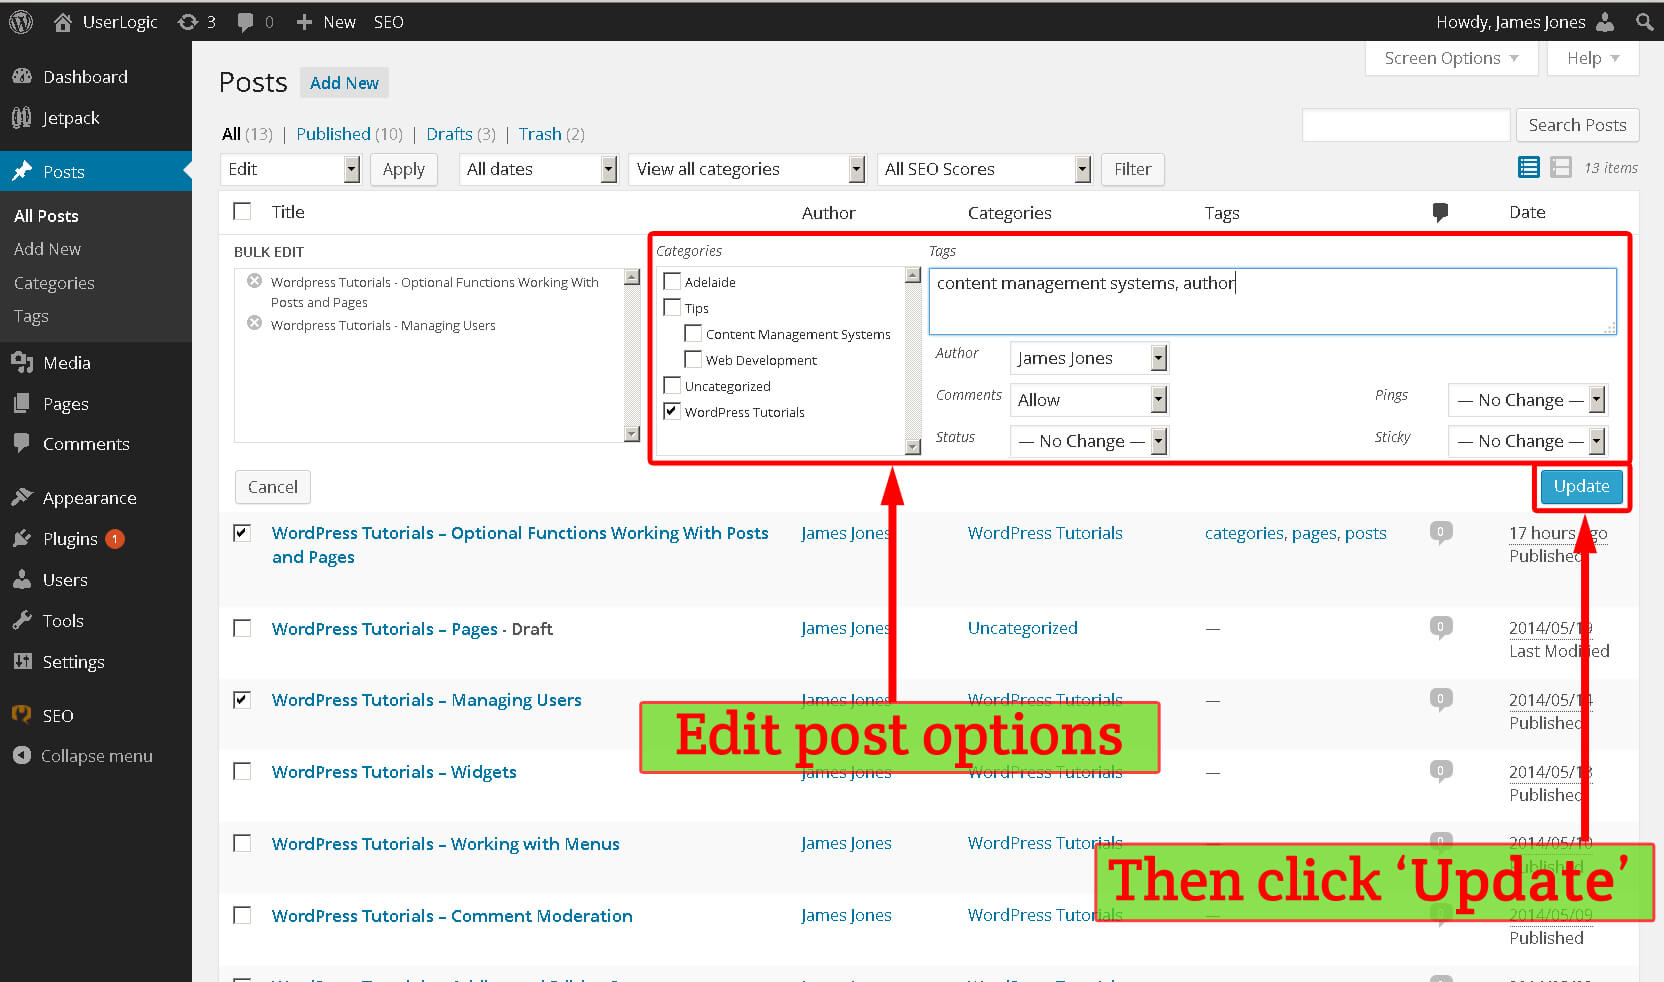
- Edit the properties that you want to edit. In the image below I’ve selected the ‘WordPress Tutorials’ category, set ‘James Jones’ as the author, enabled comments and added ‘content management systems’ and ‘author’ as tags.
- Click ‘Update’. The changes will be applied to all posts. This may take a while if you have selected a lot of posts.
Note that the bulk post editor can add categories to a post, but it will not remove them.
Deleting posts
To delete a post:
- Use the navigation menu to go to Posts → All Posts
- Hover over the post you want to delete with the mouse
- Click ‘Trash’ which will appear when you hover over the post
- The post is now moved to the ‘Trash’ folder.
Delete Multiple Posts
To delete multiple posts at once:
- Use the navigation menu to go to Posts → All Posts.
- Tick the posts you want to delete.
- From the ‘Bulk Actions’ drop down select ‘Move to Trash’.
- Click ‘Apply’.
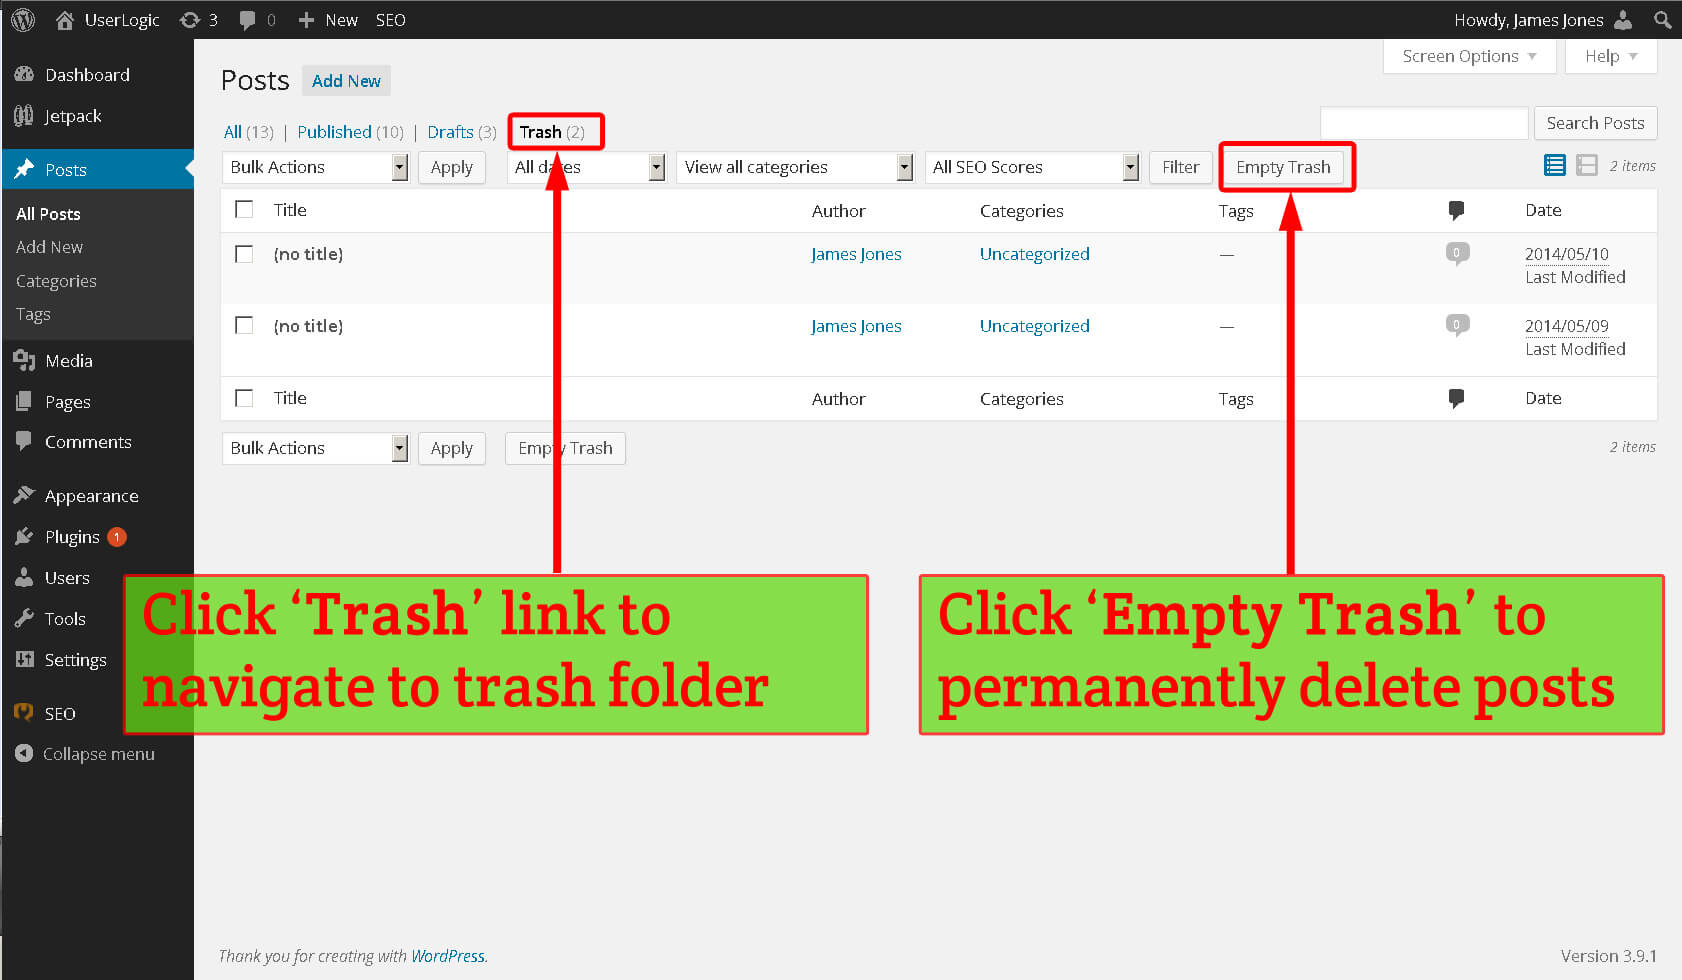
Emptying Trash
To delete posts permanently you need to empty the trash folder. To empty the trash folder:
- Click the ‘Trash’ link at the top of the screen.
- Click the ‘Empty Trash’ link that will have appeared. This cannot be undone!
What Next?
Now that you can create a post you can learn about additional features on the post editing screen.
